In the past, live streaming was only possible if you had the right hardware and software. Now, thanks to online platforms like YouTube and Facebook, anyone can share their live stream with the world.
But what if you want more control over your live streams? What if you want to run your channel on your own streaming server — without relying on any platform?
It sounds like a pipe dream, but it’s possible by setting up your own live streaming server!
In this guide, you’ll learn:
- What Is A Streaming Server
- Why Go The DIY Route
- Making Your Streaming Server in 4 Steps
- The Real Cost of a Free Streaming Server
- Build Your Own Live Streaming Platform (Without Building A Server)
Ready to explore how Uscreen’s reliable, scalable solution is helping customers monetize live events through pay-per-view, on-demand content, and memberships?
Let’s get into it!
What Is A Video Streaming Server?
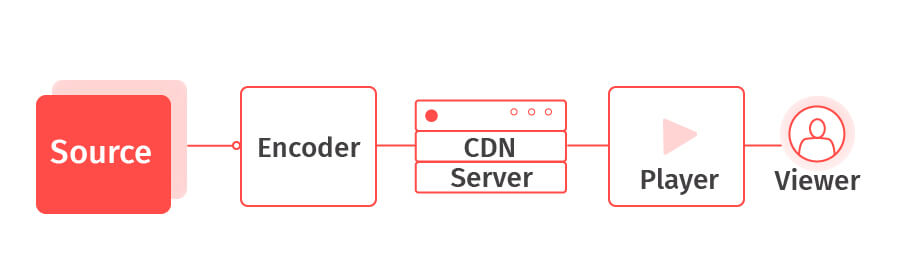
In the most basic terms, a video streaming server allows you to send and receive live video content using your own server instead of a third-party service.
For example, if you’ve been live video streaming on YouTube, you’re using its media servers to deliver the content on your viewers’ devices, such as an Android or Apple.
They handle streaming protocols, content delivery across their network of streaming video servers, and more. The streaming process is packaged with little lifting on your part.
All of these things happen in the background and you get to skip making this decision.
Let’s talk about a similar process: publishing written content. If you’re a creator, you may have built your own website in the past.
Did you choose to use a third-party service like Wix or Squarespace? Or did you build your own website using open-source software like WordPress?
Most creators who have very limited knowledge and experience building a website will opt for drag-and-drop page builders, like Wix.
But if your someone who needs a video streaming option with more control over what they live stream, and want to avoid paying a monthly fee to maintain their site, it makes more sense to build their own live streaming website
The logic and process are almost the same. But this time, you’re looking to deliver videos live from your computer to your viewers.
Delivering videos live to viewers requires more technical know-how than building a simple website with images and text.
So, if you’re going this route, you need to understand why you’re going the DIY approach.
Why Go The DIY Route
Before building your own video streaming server, you’ll have to dig deep and ask yourself why. When you focus on your motivation, you’re more likely to continue this path.
Now, there are a few reasons you might want to make your own server:
- Have more control over your content: building your own server gives you complete control, so you can operate without fear of hosting providers censoring your content.
- Customization: you can customize all aspects, from your live streaming settings to how your stream looks.
- Avoid buffering and other streaming issues: if you find that your live streams often buffer or have other quality issues, it could be due to overloaded servers at the hosting provider. By building your own server, you can ensure that there’s enough bandwidth for smooth streaming.
- Save money: while streaming services are becoming more affordable, they can still add up if you’re running a large operation or need multiple channels. Building your own server is a great way to reduce costs.
However, having full control and flexibility means you’ll also have a lot of things to think about, like security, updates, maintenance, and more.
And sometimes, as with any DIY project, things could go wrong.
This is something you’ll have to decide for yourself. If any of the reasons above resonate with you and you’re willing to put in the work, building your own media streaming server could be a great option.
How to Make Your Own Live Streaming Server in 4 Steps
There are many ways to go about building your own server. But before setting up anything, you’ll need to be very clear about your live streaming strategy and goals.
This way you can build your requirements and streaming setup based on this overarching need.
Step 1: Have Clear Requirements
The first step is to make sure that you have a solid understanding of your requirements. This will help make setting up and configuring your own video streaming server much easier.
Some things you’ll need to consider include:
- How many people do you expect to be watching your live stream at the same time?
- What type of content will you be streaming? Live video, audio, both?
- Do you need any special features or functionality? For example, do you need to be able to take payments or offer viewers premium content?
Step 2: Choose an Open-Source Server
Now that you know your requirements, you can start to look at the different options for servers.
There are a few things you’ll want to keep an eye out for. Make sure to choose a web server that…
- has enough bandwidth to accommodate the number of viewers
- comes with robust security features
- meets your cost requirements
…and other considerations for your specific media streaming requirements.
A popular option is NGINX Software, which is open-source. This means that the source code is available for anyone to use. It’s a great choice because it can run on popular operating systems like Mac OS, Windows, and Linux.
Most people use NGINX software because it’s…
- lightweight
- can handle a lot of traffic
- supports RTMP and HLS
…and offers other features that can help deliver high-quality live streams securely. RTMP is a video streaming protocol that was developed by Adobe back in the early 2000s. It’s been widely adopted by the online video industry due to its flexibility and performance.
If you need to use RTSP (Real Time Streaming Protocol), you’ll have to convert it first to RTMP before you can use it with NGINX.
You can learn more about streaming protocols from our full RTMP guide.
One thing to note is that NGINX can be a little tricky to set up. However, there are plenty of tutorials online that can help you get started.
So if you’re looking for a more reliable and powerful web server, NGINX is a great choice.
Here’s a step-by-step tutorial on which NGINX files to download and install:
Choosing an open-source web server has its pros and cons, so it would serve you well to do more research.
Choosing an open-source server has its pros and cons, so it would serve you well to do more research.
Step 3: Choose Your Streaming Software
After setting up your server, the next step is to choose your streaming software AKA media streaming server software. OBS Studio is a popular choice because it’s free and open-source.
It’s available on Windows, Mac, and Linux and has many features that make it great for live streaming, like…
- the ability to add multiple scenes
- support for various types of sources like webcam, game capture, images, text, etc.
- filters to improve the quality of your live stream
…and a whole lot more. If you find yourself feeling overwhelmed, you can always start with the basic features, such as the ability to do split-screen interviews.
If you want to use OBS Studio with NGINX Software, you’ll need to make sure you have the RTMP module installed.
If you’ve already live streamed using OBS with social media platforms previously, you’ll find that the process is similar when you have your own server.
You’ll still need a stream key to ensure that you’re streaming to the right destination and end user.
Step 4: Set Up A Content Delivery Network (CDN)
Now that your server and streaming software are set up, it’s time to create a content delivery network.
A content delivery network/CDN is a distributed server system (located locally and globally) that delivers content to viewers with high availability and performance.
The experience is pretty much the same with your wi-fi router. If you’re closer to the router, the internet is extremely fast. But if you’re far from the router, pages load very slowly.
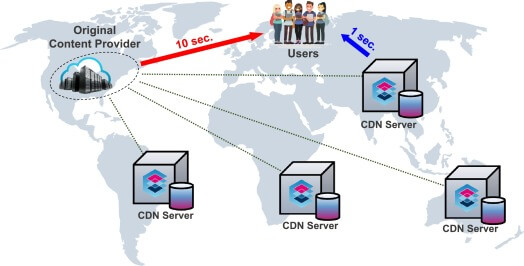
By delivering content from multiple locations worldwide, a CDN can offer a consistent experience to viewers wherever they are located.
When combined with live streaming software, a CDN can provide a reliable and scalable way to reach a global audience. CDNs achieve this by caching content in data centers that are closer to the user’s location.
If you’re live streaming from the US but your viewers are in the Philippines, the quality of the playback is still in high resolution. It also reduces latency. So, there will be fewer instances when the stream is buffering.
There are many different CDNs available, so it’s important to choose one that offers the features and flexibility you need.
Of course, on the top of the list is AWS (Amazon Web Services), but using it could get very expensive.
Here are other CDNs to choose from:
Note that these services may offer free versions, but as you access more features, the pricing can vary.
Once you’ve selected a CDN, you’ll need to configure your live stream to use it. This process will vary depending on your streaming software.
You can always refer to the CDN’s Knowledge Base or FAQ for specific instructions on how to set up the CDN with your web server. For example, Bunny Stream has an excellent documentation system and support.
The Real Cost of a “Free” Streaming Server
While you will be saving hundreds or possibly thousands of dollars each month using open-source software like NGINX and OBS, you’ll have to clock in tons of hours configuring all of your setups.
After configuration, you’ll also have to:
- Maintain your web server by updating software, adding storage, and making sure it’s always online.
- Make sure your internet connection is stable and fast enough to support your infrastructure.
- Maintain security updates to ensure the safety of your servers.
These factors require time, effort, and some level of expertise. The truth is producing videos in real-time is more stressful (compared to pre-recording a video) because there are so many things that could go wrong.
Build Your Own Live Streaming Platform (Without Making a Server)
What if there’s a way that you can build and design your live streaming platform without having to set up everything from scratch?
Imagine having your own platform like Netflix that showcases your TV shows!
If you’re a creator first and your main goal is to produce high-quality live streams for monetization, the best option for you is to choose a streaming solution like Uscreen.
With Uscreen, you can:
- Focus on your content: we take care of all the technical aspects of live streaming so you can focus on creating great content.
- Go live in minutes: it takes less than 5 minutes to create an account and start streaming on Uscreen.
- Monetize your streams: you can make money by charging viewers a one-time fee or a monthly/yearly subscription.
If your goal is flexibility and customization, we’ve got you covered. Our platform is built with page builders that you can easily edit to fit your branding.
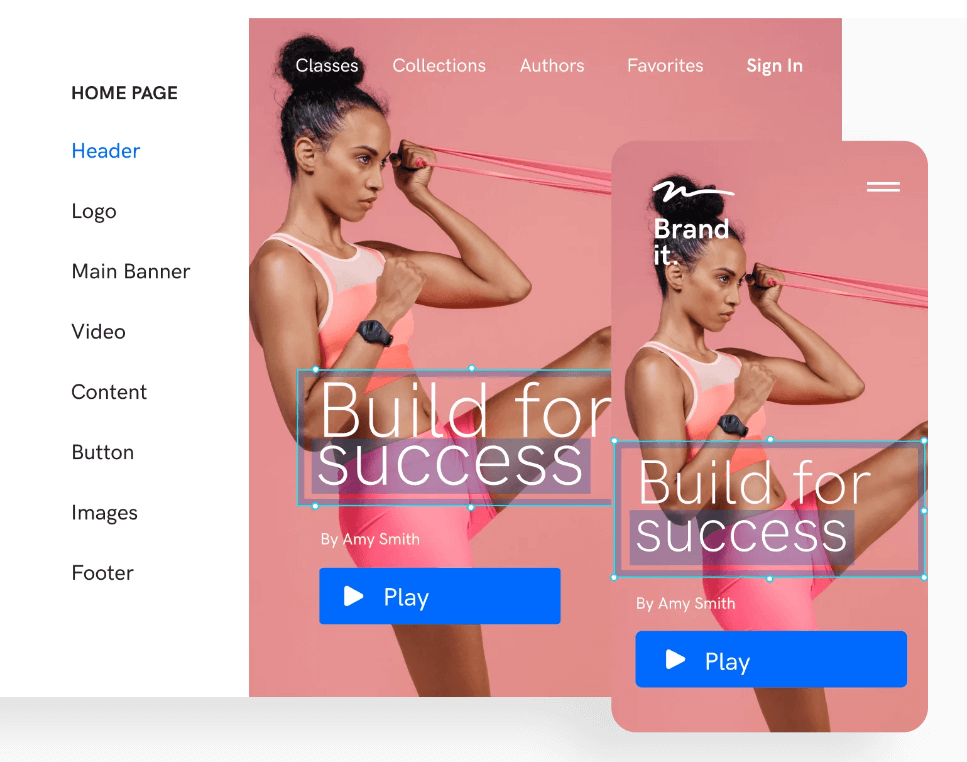
Plus, if you want to grow a full-scale video business that makes both your live and pre-recorded content available on all devices, we can make that happen too.
You can easily offer recorded live streams as videos as part of a subscription or sell them separately on your very own on-demand video channel. It’s like having your own video server for all types of video stream options.
Since you’re a budget-conscious business owner, you’ll be glad to know that Uscreen has:
- 3 pricing tiers to choose from.
- You’ll be able to downgrade and upgrade depending on where you are in your business.
- All the security and marketing features that you could ever wish for.
- Integrations with most live streaming software, like OBS.
Take TashaK Live, for example. Tasha K is a blogger and YouTuber who streams content about the latest celebrity news.
Her streams can be accessed live from anywhere and from any device made possible by Uscreen. All of her streams are available for replay as part of her entire video library.
Instead of building her server from scratch, she and her team focus on creating high-quality content and serving her community.
Ready to explore how Uscreen’s reliable, scalable solution is helping customers monetize live events through pay-per-view, on-demand content, and memberships?
Wrapping It Up
At the end of the day, it’s all about resources and priorities.
If you’re confident in your technical knowledge and skills, you should go and make your own video streaming server.
In summary, you should:
- Be very clear about your requirements.
- Be willing to invest time and effort in building your video streaming servers.
- Have the resilience to keep updating and maintaining your setup to avoid security and quality issues.
If your goal is to focus more on content and grow your revenue, Uscreen is the best alternative. It provides an all-in-one solution that is flexible and scalable.
Making Your Own Live Streaming Server FAQs
A video streaming server is a web server with built-in RTMP capabilities for broadcasting live streaming video or on-demand video to viewer’s smart TVs, computers, or smartphones.
A video streaming server captures video and audio from a source, like a computer, and transmits both to viewers on devices like smart TVs, computers, and smartphones.
Video streaming server costs vary, depending on the costs of hardware which start from around $1500 upwards. You’ll also need to consider the running cost of owning a live streaming server, such as electricity, cooling systems, and monthly bandwidth fees.
You need a live streaming server of your own if you’d like more control over your content. Most video video on-demand platforms can, and do, sensor content, and may also remove it based on usage policy requirements. Owning a live video streaming server can circumvent these challenges. But no, you don’t NEED your own streaming server in order to stream. Check out Uscreen as an alternative that still gives you control over your content.
You need a streaming platform to stream if you choose to not create your own video streaming server. Streaming platforms like Uscreen come with complete control for creators, offer a range of features designed to make it easier to get your content out to your fans and focus on creating and not the technical aspects of video streaming servers.
You can start a live streaming server by following these steps:
– Choose an open-source server.
– Choose your streaming software.
– Set Up A Content Delivery Network (CDN).
Building a live streaming server can take a couple of hours to complete. The time it takes to complete the build will depend on your understanding of key concepts.
While you are not required to obtain a broadcaster license for personal live streams (live streams that don’t include commercial or public events) it’s best if streamers obtain permission for copyrighted material and understand fair use principles to avoid copyright infringement.
Respecting privacy rights is essential, including obtaining consent from individuals featured in streams and being cautious about filming in private locations.
Requirements for a live streaming server include:
– A capable CPU for handling large amounts of tasks.
– Enough RAM to handle simultaneous streams.
– A robust hard drive for storing and quickly and easily accessing stream content.
– Sufficient port size that allows maximum bitrate for the best possible video quality.
Yes, you need streaming software to create your own streaming server. It’s part of a streaming setup. and streaming software will be installed on your video streaming server’s operating system.