Picture this: you just created one of your best videos yet. You hit “publish” and eagerly wait for the views to start coming in.
But after a couple of days, you’re still missing the traction you expected, which makes you think that the problem is your content. Sound familiar?
The thing is, your content is likely engaging and valuable. You’re just probably missing the key component that increases click-through rate: an eye-catching video thumbnail.
After all, it’s the first thing viewers see when they come across your video. So, you need to make a good first impression.
All this to say, creating visually appealing and eye-catching video thumbnails is one of the first ways to reel an audience into viewing your video content.
Lucky for you, we have the perfect recipe for creating the best video thumbnails that will start driving more views to your videos.
Let’s jump right in.
Build, launch and manage your membership, all in one place.
So, What Is a Video Thumbnail?
A video thumbnail is essentially a preview of what your videos are about.
Think of it as a cover to a book — people will sometimes decide whether they want to read the book by only looking at the cover. This means people will judge your video based on the thumbnail you pick.
So what does a thumbnail look like? A video thumbnail will usually have a screenshot of part of your video to make it easier for users to know what your video is about.
But a good video thumbnail will also be eye-catching and include words and images that pop among all of the other thumbnails around — like your video is competing against the others for attention.
But, Why Should I Create a Video Thumbnail?
To show the importance of a video thumbnail for increasing click-through rates, let’s start with an exercise.
If you’re looking for a video to watch, and you see these two thumbnail options, which one would you click on?
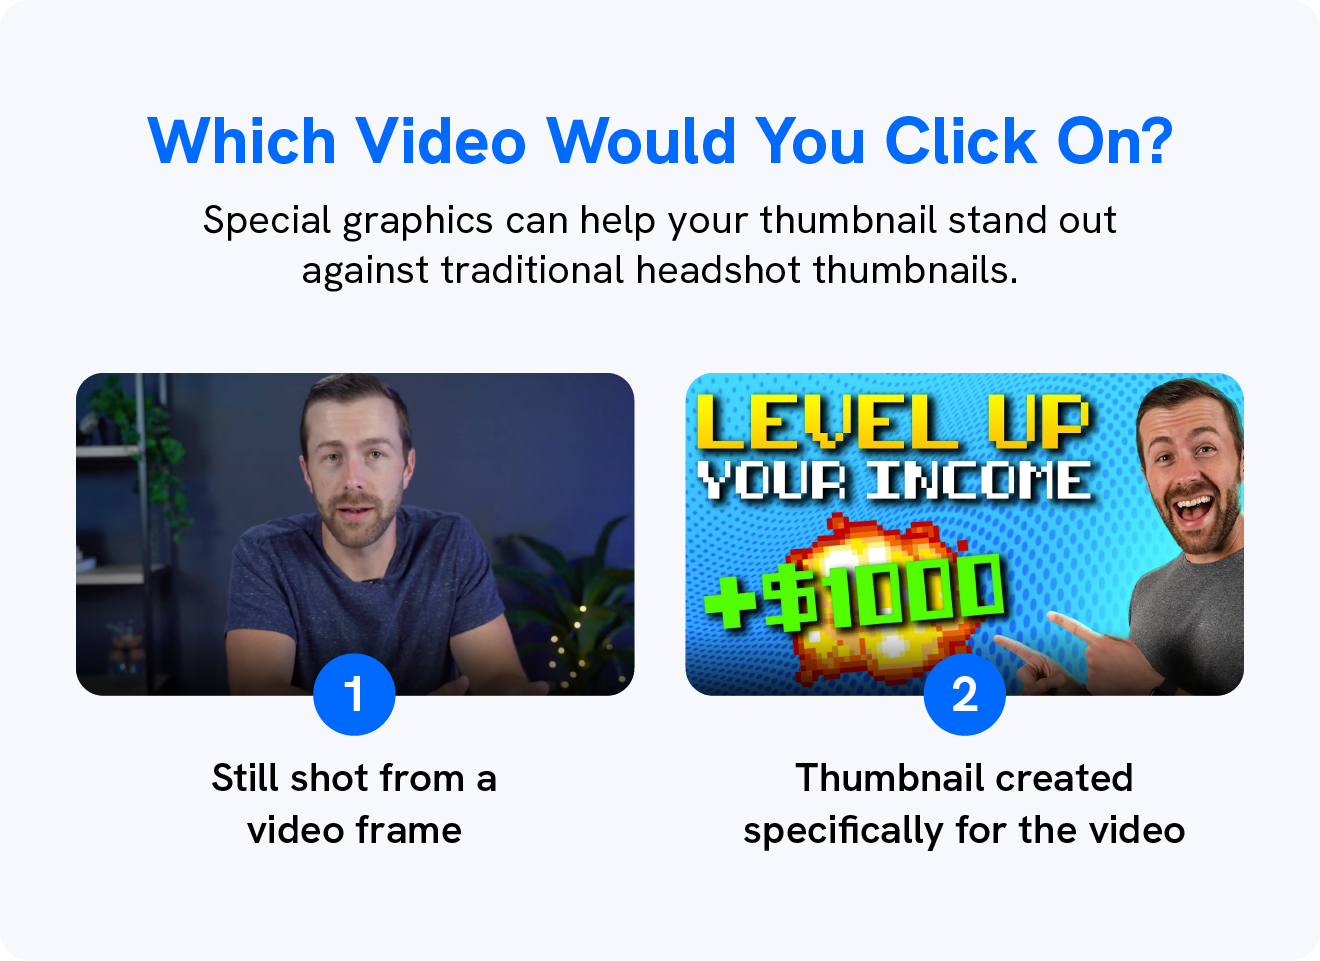
Sure, with option number one, you can probably guess he’s talking about something that could be interesting, but won’t know what the video is about just by looking at the thumbnail.
But option number 2 immediately tells you that the video is about how you can level up your income, without even looking at the video title. Plus, the bright colors, text, and the huge smile on his face will immediately jump out amongst the other videos.
When you create bright, beautiful video thumbnails that create clear expectations as to what’s inside the video, your audience is going to be excited to tune in.
However, if you publish a video on YouTube, for example, it will automatically create a thumbnail for you from a frame of your video. That’s why you should create video thumbnails that will catch viewers’ attention, just like option 2 did.
There many other benefits to creating a video thumbnail, as it:
- Helps YouTube rank your video since it helps them understand what your video is about and increases the chances of people clicking on it when searching for something on Youtube.
- Shows you’re committed and have a brand strategy if your thumbnails are consistent with branding.
- Encourages brand awareness since people will be able to recognize your video right away.
- Allows your video to rank on Google with blog posts if your video is ranking on YouTube and answers a search query.
Even big video-on-demand brands, like Netflix, are creating video thumbnails for their original shows.
Cool, So How Do I Make a Video Thumbnail?
Now that you understand why you should put effort behind video thumbnails, you’re probably ready to start creating them.
And because you want a clear representation of your video content to be shown within your thumbnail, we’ll go over the steps on how to do it.
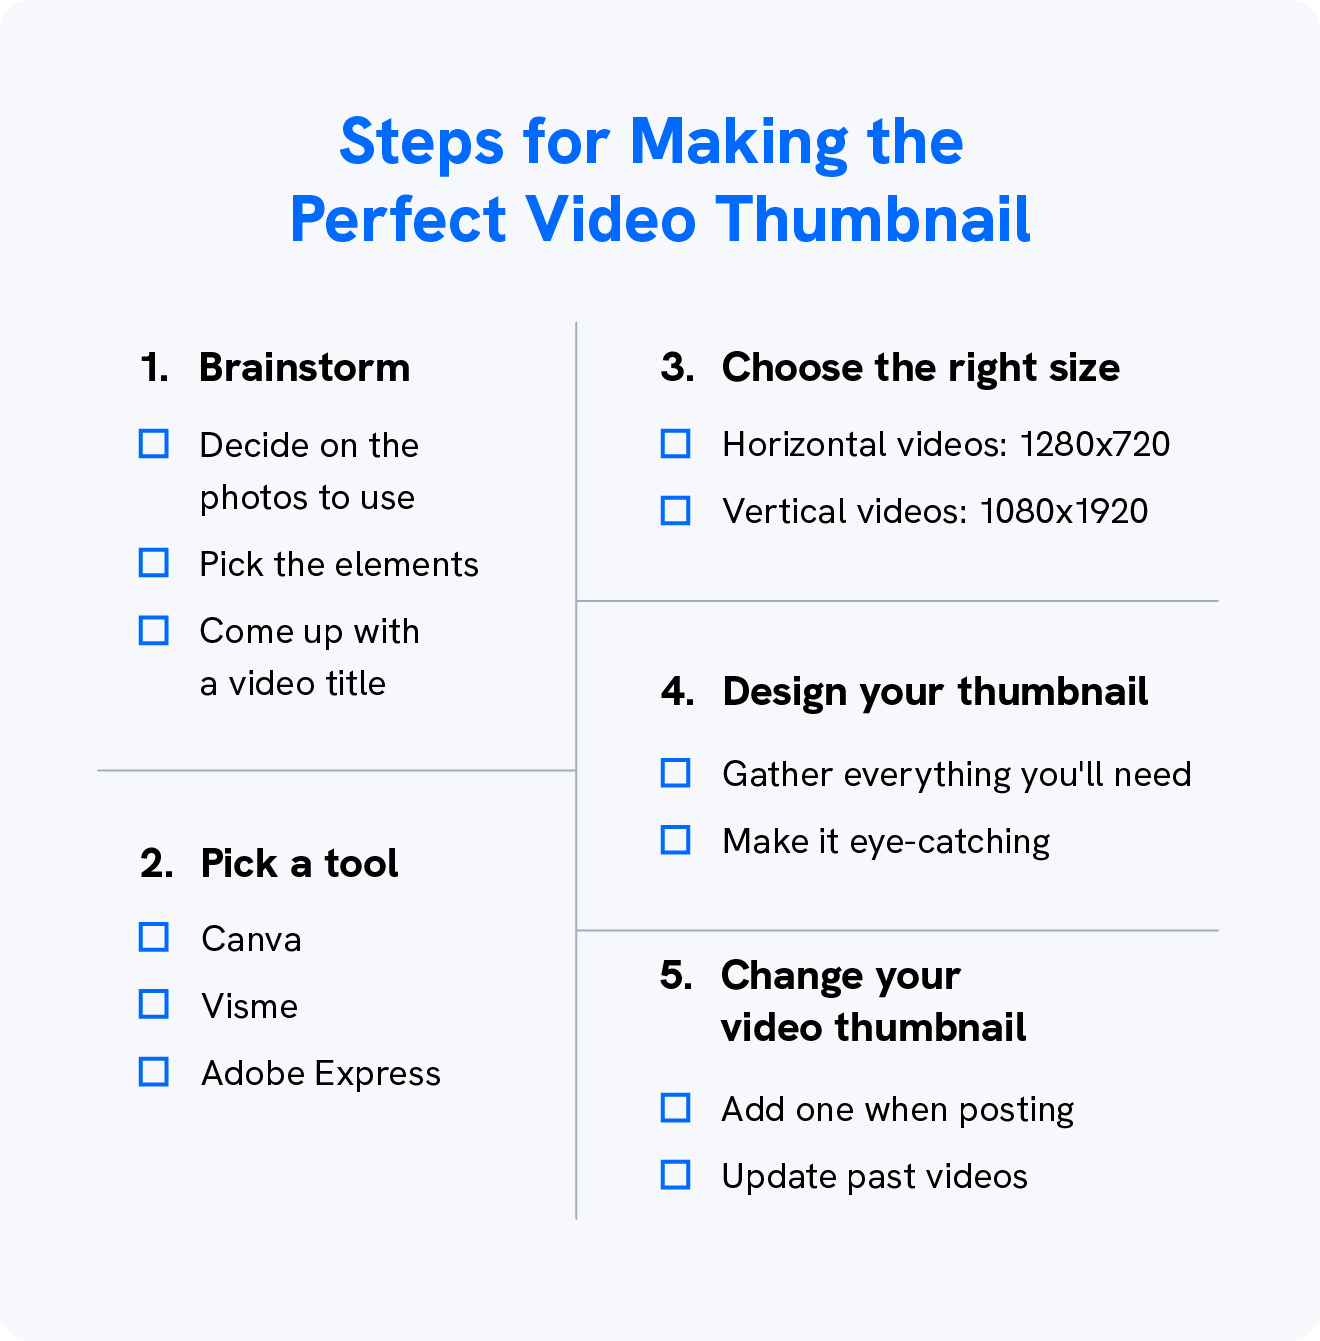
1. Brainstorm
The first step is to brainstorm what your video thumbnail will look like. To do that, you have to take into consideration the essential elements of a video thumbnail.
A good video thumbnail will:
- Include bright colors, icons, and faces.
- Look good on every device.
- Have a design that matches your brand.
- Show what the video is about.
- Make people want to click.
With that, you’ll be able to brainstorm what should be included in your thumbnail, and consider how you can make it stand out from the others.
One good way to brainstorm for your video thumbnail is to ask yourself how viewers can benefit from watching your video. Will they learn something new? Are you giving a surprising update? Or are you posting a new vlog?
With those questions in mind, you’ll be able to pick the still shot you’ll be including, the text, and the visual elements.
Once you get those down, it can be a good idea to draw out 2 to 3 options of how your thumbnail will look and ask for someone’s opinion on which one they would click on.
2. Pick a Design Tool
There are plenty of tools out there that will allow you to create a thumbnail, so you can pick one that you’re most comfortable with.
Here are some tools we recommend:
- Canva has pre-set YouTube thumbnail templates that you can play with by adding images, colors, and shapes.
- Visme has a free thumbnail maker so you can make professional-looking thumbnails, and they also have plenty of templates you can use.
- Adobe Express lets you create unique templates with royalty-free photos and icons.
- Procreate will be helpful if you want to add annotations and highlight areas of your thumbnail with your own handwriting.
With these tools, you’ll also be able to reuse templates in order to make it easy to create new thumbnails in the future and keep brand awareness top of mind.
3. Choose the Right Size
Most videos have a 16:9 aspect ratio, so you want to make sure that your video thumbnail fits that same size. Otherwise, important bits of your thumbnail could get cut off when users see it.
If you’re using a tool that comes with thumbnail templates, then you’re in luck. All you’ll have to worry about is designing something that catches people’s attention.
However, if you’re sizing your thumbnail yourself, the ideal thumbnail size is 1280×720 with a minimum width of 640 pixels for 16:9 aspect ratio videos, like YouTube.
And if you’re creating a thumbnail for Instagram Reels, YouTube Shorts, or anything vertical, the aspect ratio changes to 9:16, so you should size it as 1080×1920.
Keep in mind that if you’re creating a thumbnail for Instagram Reels, you will have to keep the most important contents of your thumbnail in the center, since Instagram automatically cuts thumbnails into a square for the Feed view.
4. Design Your Thumbnail
The next step is to start designing your video thumbnail.
Start by gathering the still shots you’ll be including in your design or taking a high-quality photo that represents your video. You can also choose to go with a stock image if it makes sense for your content.
Then consider which elements you’ll be adding to your thumbnail, including shapes, arrows, and colors. Remember to bring focus to the most important part of your design.
Lastly, choose a font that is easy to read and stands out in your design. Big, bold fonts and box overlays will be your best friends here.
5. Change Your Video Thumbnail
Now it’s time to add your thumbnail to your video.
If you want to add a thumbnail to an existing YouTube video or to a new one, all you need to do is:
- Click the video you want to edit or that you’re uploading.
- Select “Upload thumbnail.”
- Then click “Save.”
If you’re adding a cover photo for your Instagram Reel, you can edit your published Reel and select “Cover,” where you’ll have the option to upload a custom image.
It’s also very easy to add a video thumbnail in your Uscreen account:
- Navigate to “Content.”
- Click “Edit,” then “Appearance.”
- Select “Player Image” and upload your video thumbnail.
Simple, right? Let’s go over some of our expert tips for creating seriously eye-catching video thumbnails — our secret sauce, if you will.
Any Other Tips for Making My Video Thumbnail Stand Out?
If you’re looking for some extra inspiration on how you can level up your video thumbnail designs, take a look at videos on YouTube or even your favorite video-on-demand service.
However, we’re bringing our best tips directly to you.
Let’s dive into our top design tips to ensure your video thumbnails are working to increase your paying subscribers and generate views and engagement.
1. Use a Still Shot From Your Video
You want a clear representation of your video content to be shown within your thumbnail. The best way to do that is to use a still shot from your video as the main focal point of your video thumbnail.
Grab a high-quality screenshot to use as your video thumbnail, like the new yoga pose you taught in your video, like Yoga With Adriene does.
This is a great way to create stunning video thumbnails that let potential viewers know exactly what they can expect when watching your content.
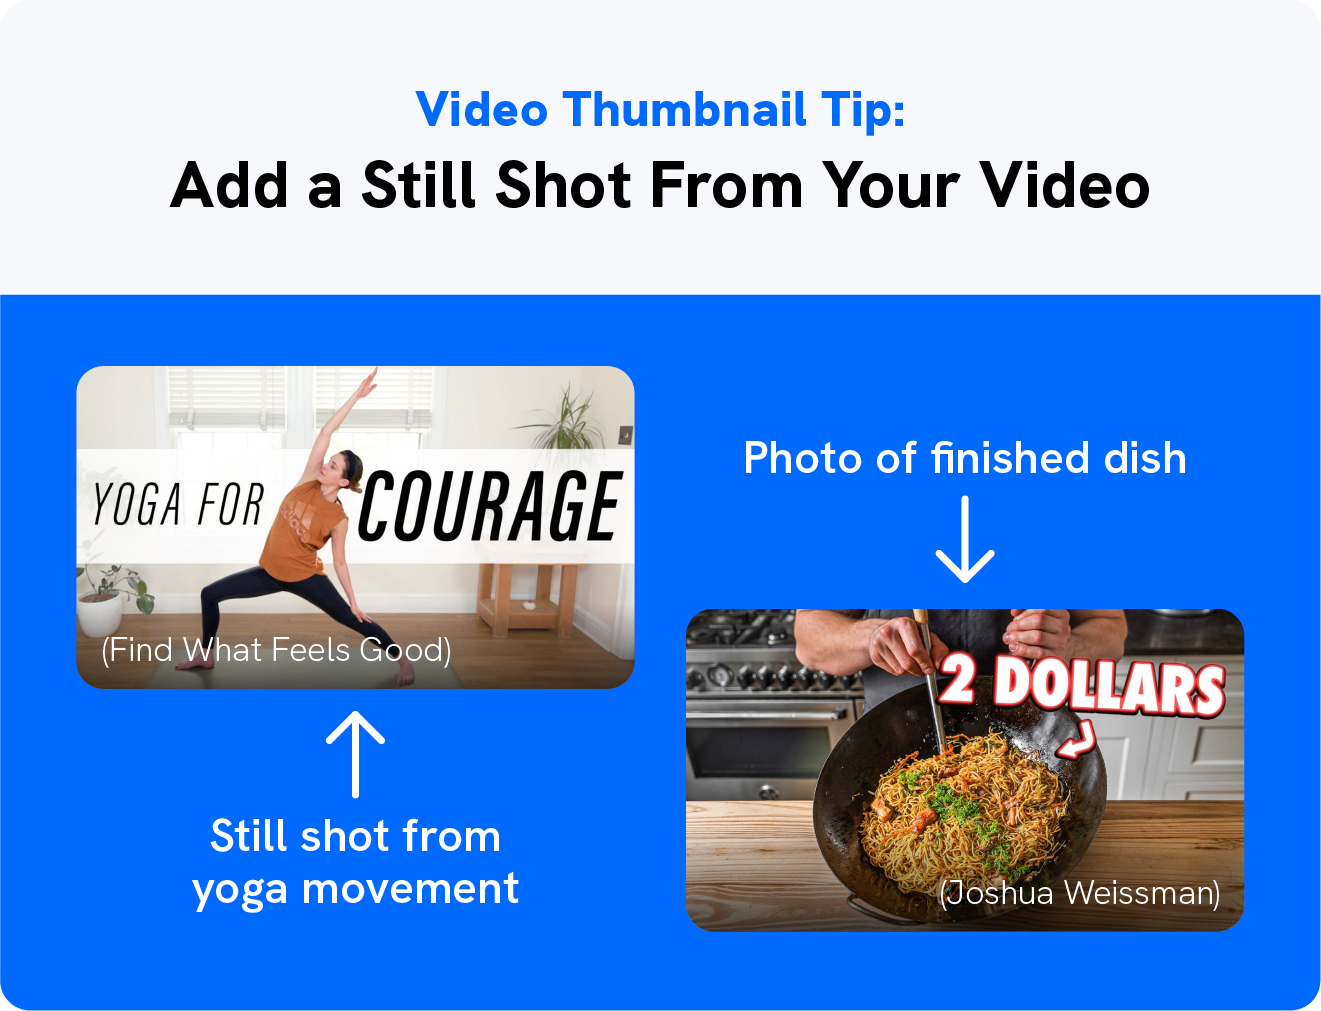
Another option is to take a photo with a high-quality camera to use specifically for your thumbnail. Joshua Weissman does this by taking a photo of his finished dish, enticing viewers to learn how to make it.
This is also a great route to take if you have someone speaking throughout the video and you want to make sure you have a clear photo of them while they’re not in the middle of a sentence.
2. Include People in Your Photo
If you’re recording someone speaking or people doing an activity or demonstrating something, make sure that your video thumbnail includes them in it.
People like to see other people, so having a person or a face in your thumbnail can help create a stronger connection.
Even just a simple photo of someone running can help make your point and create a bond with your potential viewer, similar to what Natacha Océane
did for her video.
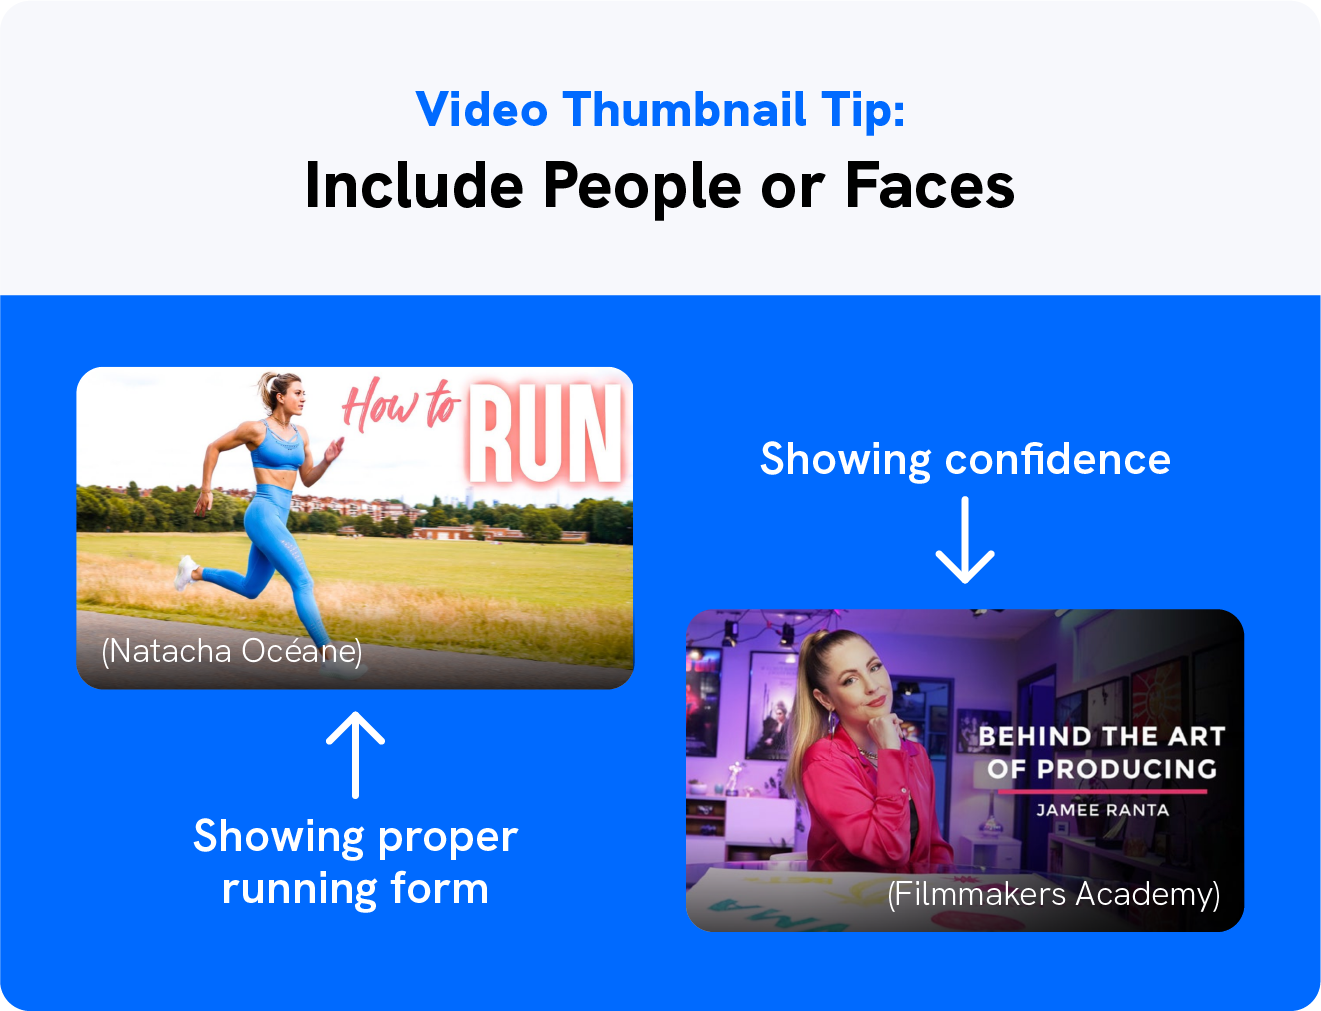
This is also a great way to show the sentiment of the video.
So if you want to show that you’re confident and know what you’re talking about, you can include a photo of you smiling with a hand on your chin or crossing your arms, as we see on Filmmakers Academy.
If taking a high-quality photo for your thumbnails will be difficult, you can always take advantage of relevant stock photos to create the effect you’re looking for.
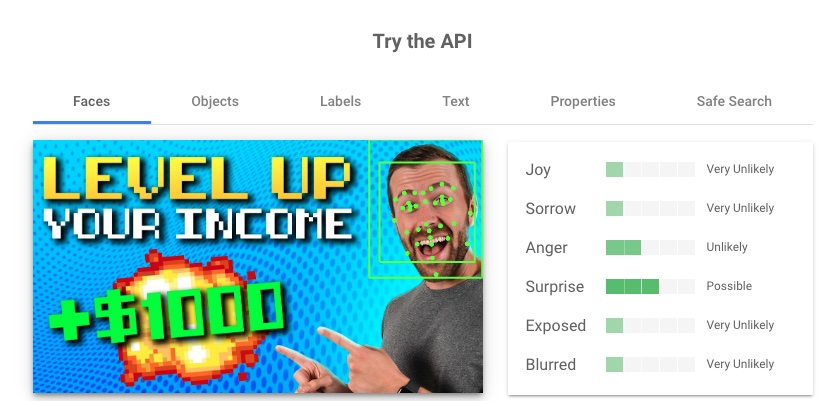
What’s more, Google’s Vision API is able to recognize text, images, and facial expressions in images. This will also help YouTube better understand your video and recommend it to the right people.
3. Add Your Video Title
You also want to include your video title or topic in your video thumbnails. Place it right on your video thumbnail in a clear, bold font so it’s easy to see.
And while the video title section will also share what the video is about, having a text overlay on your image is way more attention-grabbing than your basic text title.
There are a couple of different ways that you can add your video title onto your thumbnail.
One easy way is to create a color overlay that your text sits on to stand out from the background photo or collage, similar to what Ahrefs does. This can be an opaque or translucent color overlay to help offset your title from the rest of the design.
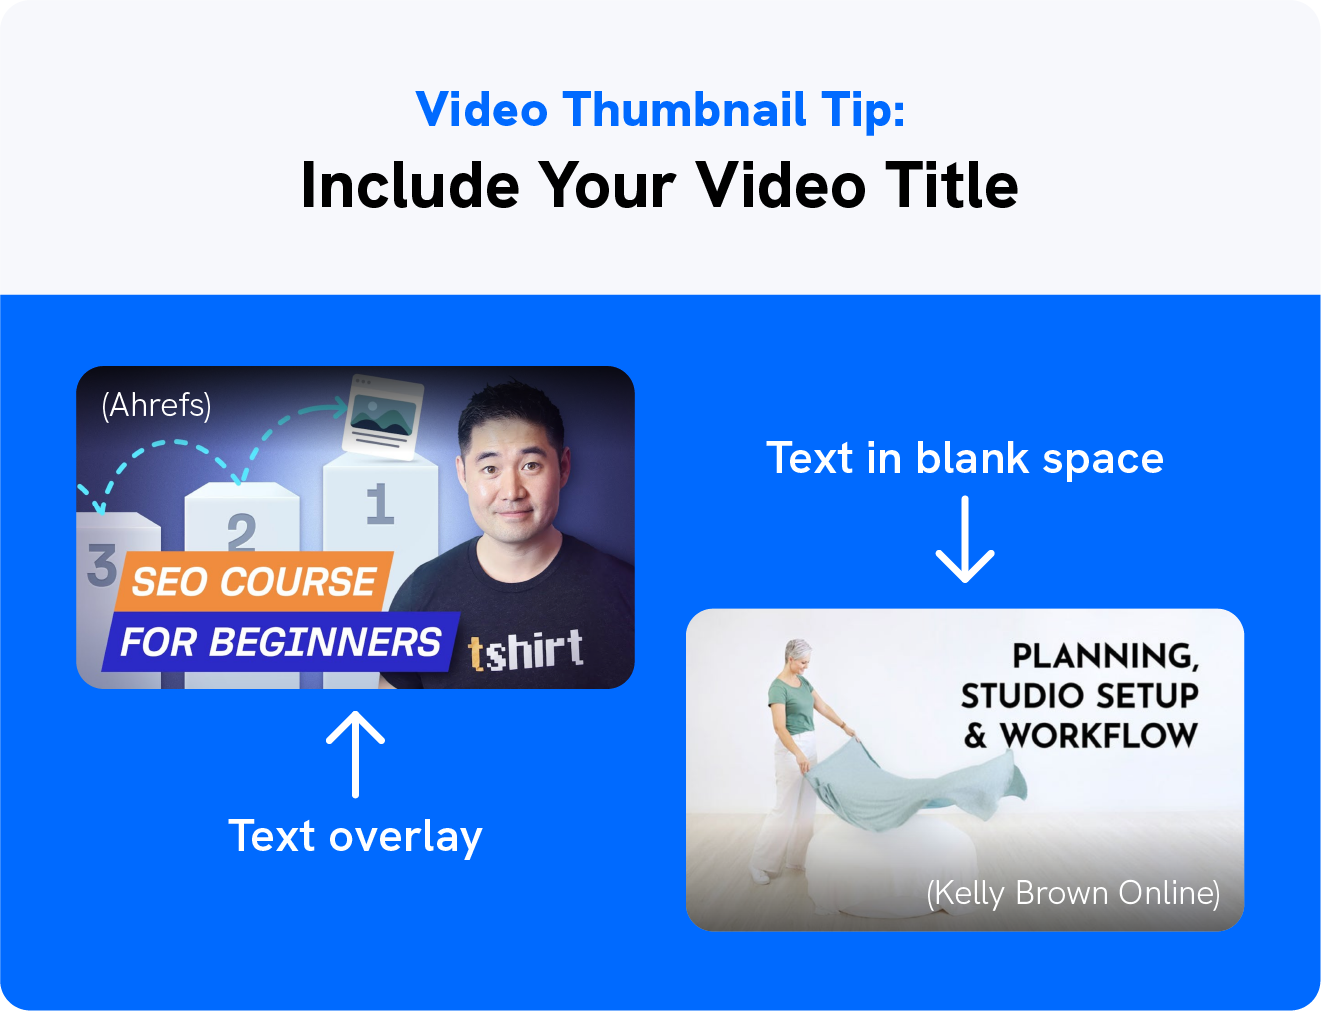
Another option is to use a photo with a lot of blank space as your thumbnail photo. In Kelly Brown Online‘s video thumbnail, the white space creates the perfect spot to add a stand-out video title.
Or, you could simply make sure you’re using bright colors that contrast with your background in a bold font that is easy to read, like in the example below.
Whether you’re uploading your videos to YouTube, housing them on a landing page, or even sending them in an outreach email, you want to make sure your audience can immediately see your title and know what your video will be about.
4. Use Big, Bold Text
And just to drill it in a bit further: you need to ensure that you’re using a big, bold font, preferably sans serif.
You can go for a sans serif font like Fira Sans Bold, Montserrat, or League Spartan. Script fonts can make your text look messy and harder for a potential viewer to read at first glance.
Using big and bold fonts on your thumbnail will bring the viewers’ attention to what your video is about, like how the channel About To Eat does.
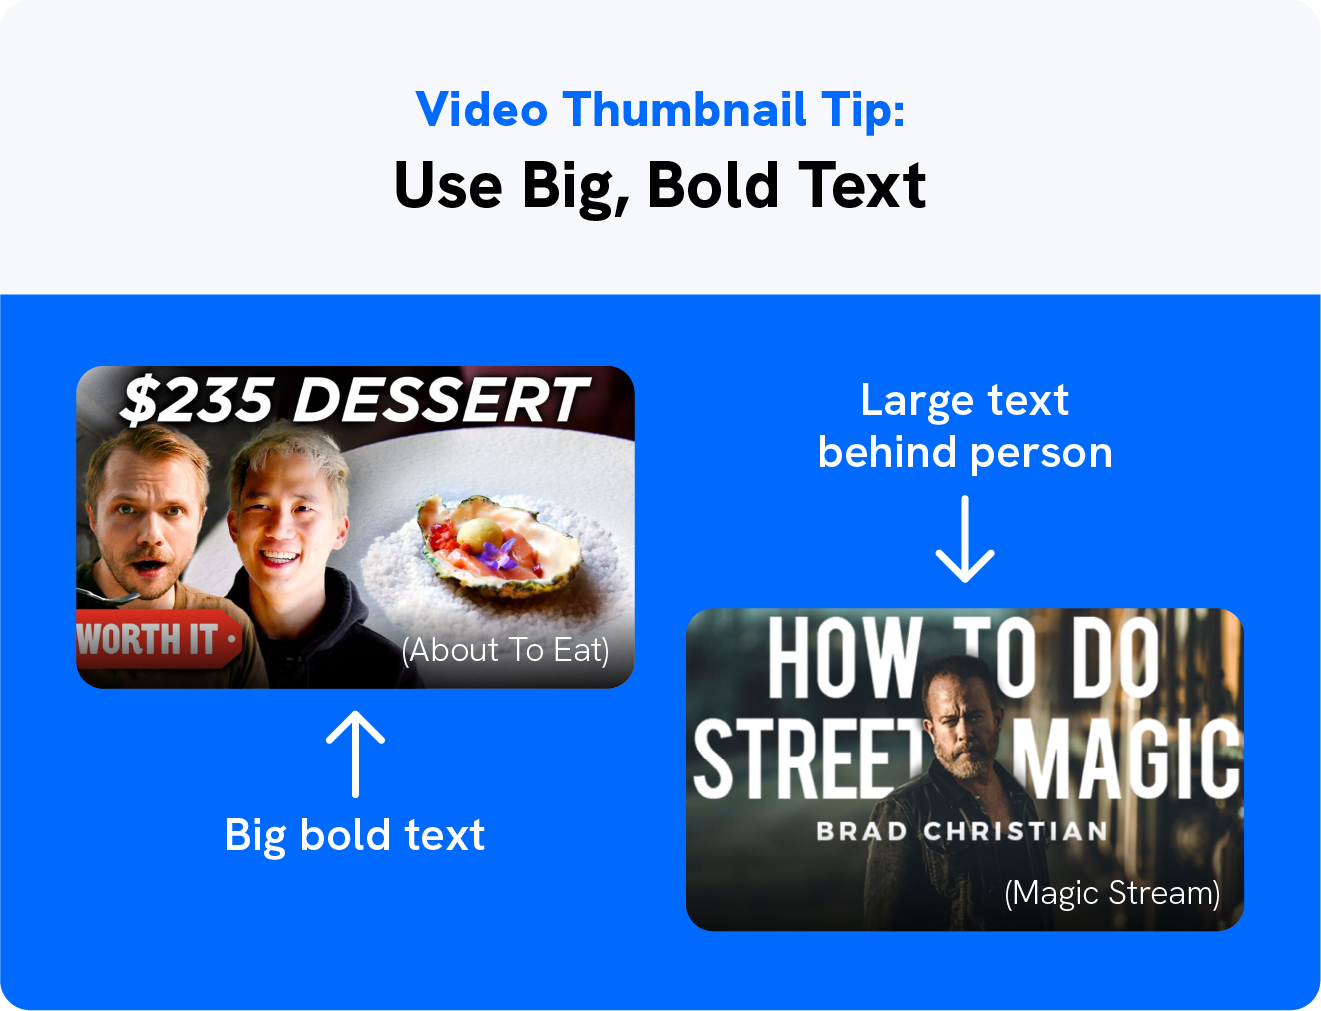
And if you want to be more creative, you can make your text appear behind the subject on your thumbnail photo, like Magic Stream does. This will make your thumbnail look professional while still catching viewers’ attention with large text.
5. Use Bright Colors
You want to create contrast between your design, your text, and your background photo, and the best way to do that is to use bright colors in your video thumbnail design.
Bring color in through your photos, a background color, your text, various shapes, and other design elements you add to your video thumbnail. This helps with standing out from the crowd.
When picking a color for your thumbnails, remember to consider your branding and whether it makes sense with the content you’re delivering.
You can add a bright, solid background color that will give some contrast with text and images, similar to what Stripy Sock Club does for their membership site videos.
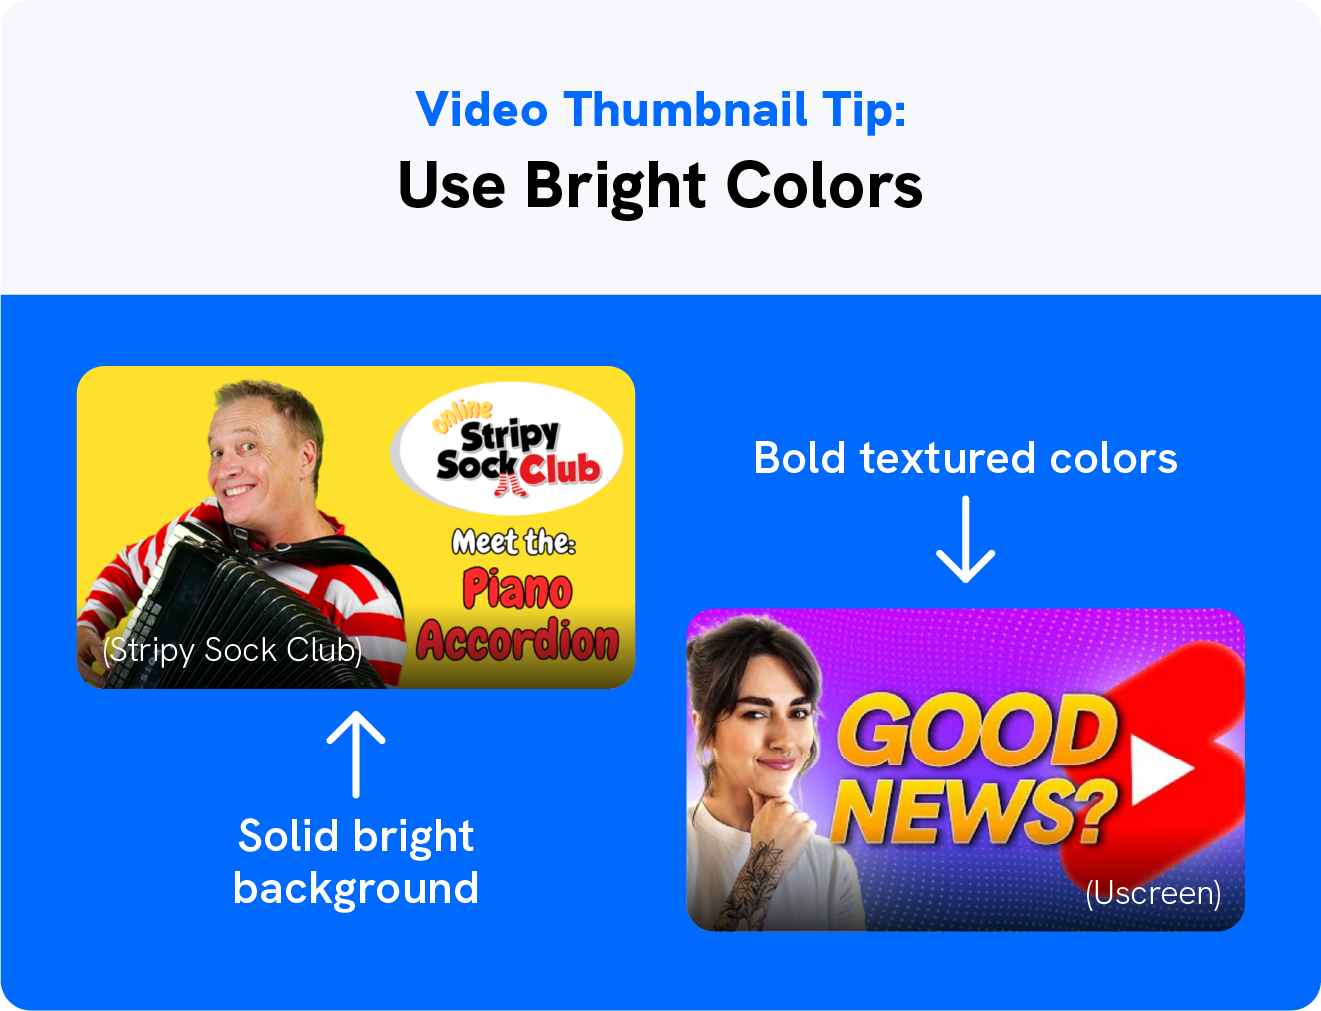
Or you can go the adventurous route and use a bold textured background that will immediately drive viewers’ attention, just like we’ve been doing for our YouTube channel.
If you occasionally release a special video series or playlist, you can choose a specific color to add to the thumbnails. That way viewers will be able to tell that the video is part of your series.
6. Incorporate Shapes and Annotations
Shapes can be used in so many ways. Add rectangular backgrounds behind your text to help it stand out, use shapes to create geometric designs, and more.
Shapes, design elements, and drawings, can help you highlight areas that you want the viewers to pay attention to the most, similar to what Design with Canva does.
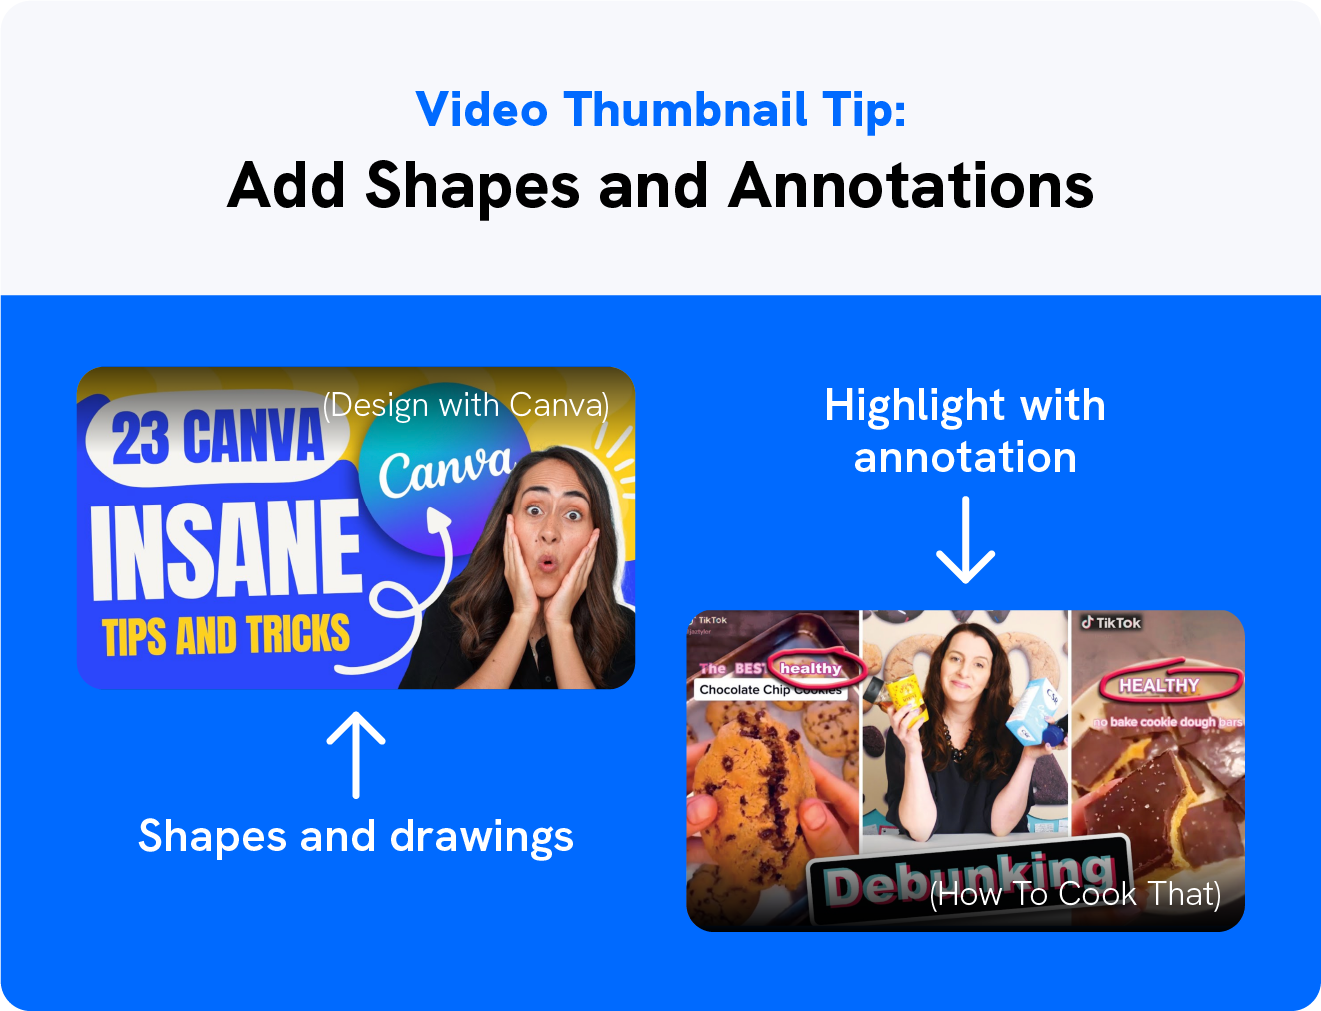
And speaking of highlighting areas, you can also use arrows and annotations to help bring attention to something specific in the image or explain what’s going on.
You can see that in the channel How To Cook That, where they highlight the word “healthy.”
7. Add Branding
You always want to make sure your brand is easily recognizable in your video thumbnails, and inserting your logo into one of the corners is a great way to do that.
Adding your logo to the top right corner helps with brand recognition and ensures that anyone who sees the thumbnail knows you produced the video, similar to what Visme does for their channel.
Remember that your logo shouldn’t be a focal point of the thumbnail, but making a spot in the corner of your thumbnail is great for brand strength.
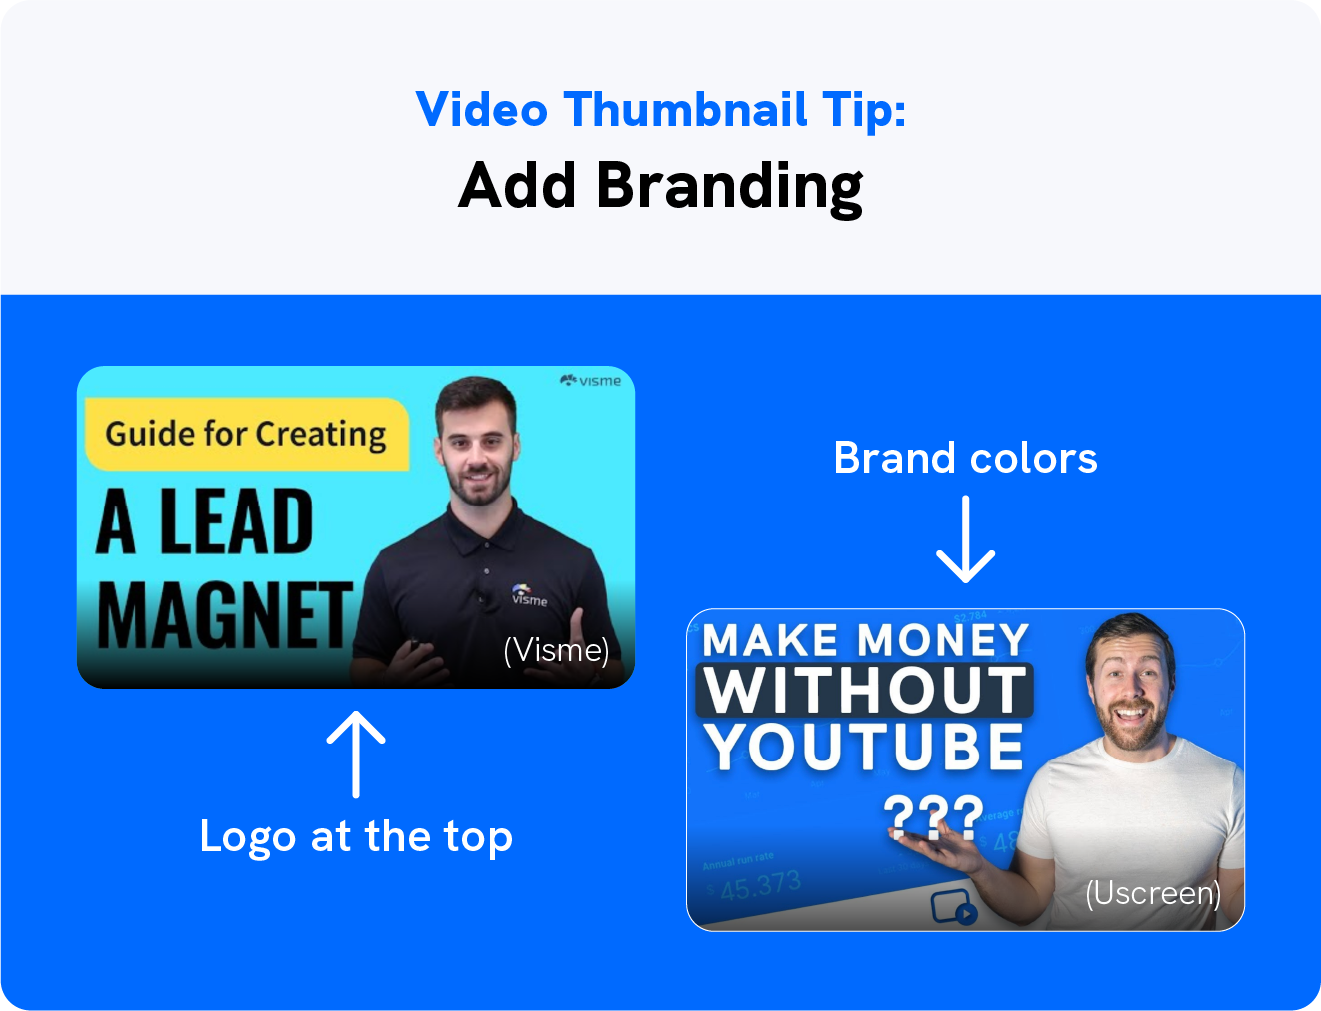
Another way to strengthen your brand and ensure recognition is to incorporate your brand colors and fonts in the design, similar to the Uscreen YouTube channel.
Better yet, this can help make color scheme and font pairing choices that much easier, as well as create a cohesive look on your website or YouTube channel.
All of the fonts in each video thumbnail match, and the background photos stick to a similar theme, bringing the entire video library together.
Wrapping It Up
There you have it! A complete guide to creating the best video thumbnail that will help you increase your click-through rate.
Now you can give your video library a beautiful and cohesive feel by designing engaging video thumbnails that encourage viewers to watch your videos and subscribe.
Take these design tips to help ensure your thumbnails draw an audience in instead of pushing them away.
Build, launch and manage your membership, all in one place.


