Videos files can be very large—and that can be a problem for uploading and hosting.
Unless you need the highest resolution possible, making video files smaller is better for everyone. They reduce bandwidth usage and upload time, and there’s less buffering on your viewer’s end.
Moreover, this will drastically speed up your video creation and editing process as you don’t need to work with large video files.
But how do you easily compress a video, and reduce the file size?
We’ll take a look at six ways to make your video file smaller, both from your computer and online.
There are two reliable ways to reduce video size without quality loss. The first is to make your video shorter. If you can trim footage off of the beginning or end, that will reduce the size of the file.
The second method is by removing the audio from your video. Most videos will probably benefit from having audio and background music included, but if it’s unnecessary, you can remove it. That will decrease the file size without any loss of quality.
With that out of the way, let’s look at how to compress a video and make a video file smaller.
6 Best Free Video Compressors in 2023
Here’s a list of 6 free video compressor tools that are available today to help you reduce your video file sizes. You’ll learn about the features they offer, and how to use them to compress your videos.
- VLC (Windows, Mac, Linux)
- Shotcut (Windows, Mac, Linux)
- QuickTime Player (Mac)
- VEED.IO (Web)
- VideoSmaller (Web)
- Clipchamp (Web)
To compare options and see which one is best for you, read on!
Video Compression & Understanding Video File Size
Before we get started, it’s important to understand what makes a video file larger or smaller. There are three main factors: resolution, bitrate, and encoding.
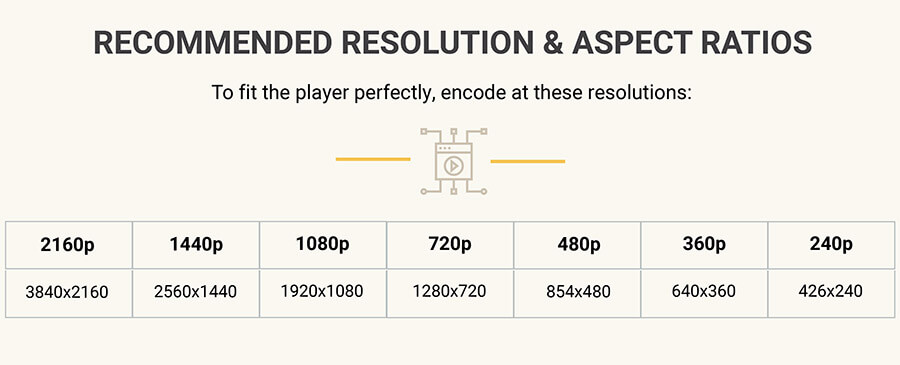
Resolution is the number of pixels presented in your video, and it is usually represented by a horizontal x vertical measurement (for example, native HD, also referred to as 1080p, is 1920 x 1080.) That provides high-definition quality.
The 16:9 aspect ratio is very common and includes a number of other resolutions. Here are the video resolutions that YouTube recommends for various measures of quality:
Here at Uscreen, for the best upload and video playback experience, we recommend following these video encoding and compression guidelines:
- Video Format: MP4 (file extension .mp4)
- Video Resolution: 1080p/2K or smaller
- H.264 video codec – the most common codec and supported by the majority of devices and browsers
- 20 fps – 60 fps (23.98 fps is a good option)
Recommended Video Quality
Here at Uscreen, for the best upload and video playback experience, we recommend following these video encoding and compression guidelines:
▶️ Video Format: MP4 (file extension .mp4)
▶️ Video Resolution: 1080p/2K or smaller
▶️ H.264 video codec – the most common codec and supported by the majority of devices and browsers
▶️ 20 fps – 60 fps (23.98 fps is a good option)
So which resolution should you use? It largely depends on where your audience is likely to watch. For example, 1080p is probably plenty for users streaming YouTube videos, as many monitors still don’t go above 1080p (and the bitrate, as you’ll see in a moment, may become prohibitive for streaming).
For what it’s worth, every one of the top 10 best-selling daisy-chain monitors on Amazon at the time of this writing has a resolution of 1920 x 1080.
If your audience is likely to watch on their TVs, though, higher resolutions are better (though around 31% of Americans have a 4K TV, so streaming in 1440p or 1080p is almost certainly fine for larger screens).
An audience that primarily uses their smartphone to watch your videos is a bit more difficult to plan for, as phones have different resolutions, screen sizes, and pixel densities. The difference between 720p and 1080p is noticeable on a phone, but it may require the user to be within 6” or 8” to tell the difference.
With so many phones now coming with extremely high-definition screens, it’s probably better to err on the side of high resolutions when you have the bandwidth to do so. The iPhone 12, for example, packs a 2,532×1,170 pixels screen and has a pixel density that’s far greater than the human eye can even appreciate.
Possibly the most important factor in determining video size is the bitrate. This is a measure of how much information is transmitted every second, and is usually measured in Mpbs (and sometimes kbps). Here are YouTube’s recommended bitrates for different sizes and framerates:
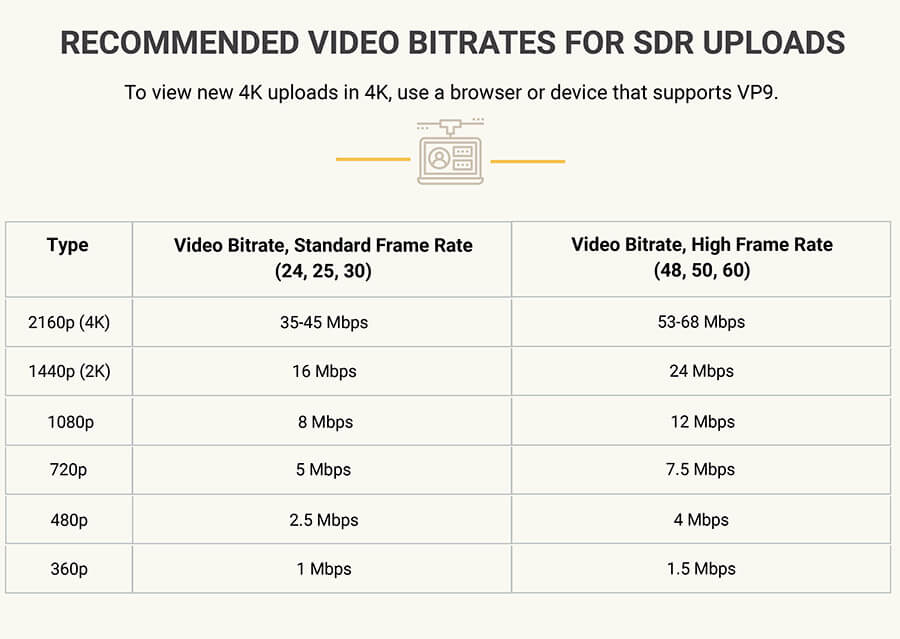
If you change the bitrate of your video, try not to go below these figures.
It’s a good idea to use a variable bitrate, which allows your video to go above or dip below your target bitrate. While this gives you a little less control over your video size, it will result in greater quality, as you video will transmit more information during scenes where it’s necessary.
Finally, we come to encoding. Video encoding uses two different parts: the codec and the container. A full discussion of both is very technical, but we recommend using H.264 encoding with an MP4 encoder. This is an efficient method of compressing your video, and will result in only a slight loss of quality.
It’s important to remember that making a video smaller will almost always result in a loss of quality. You compress a video by removing information, and that means anyone viewing it on a large screen will probably be able to tell.
And, as we’ll discuss a bit later, you can always experiment with different settings to see what works best for your video and your production equipment. Different resolutions, bitrates, and encoding settings will give you distinct results—and some may be better for you than others.
How to Reduce Video File Size without Losing Quality
1. VLC (Windows, Mac, Linux)
As one of the most popular media-viewing and -editing apps around, it’s no surprise that VLC is a great choice for making video files smaller.
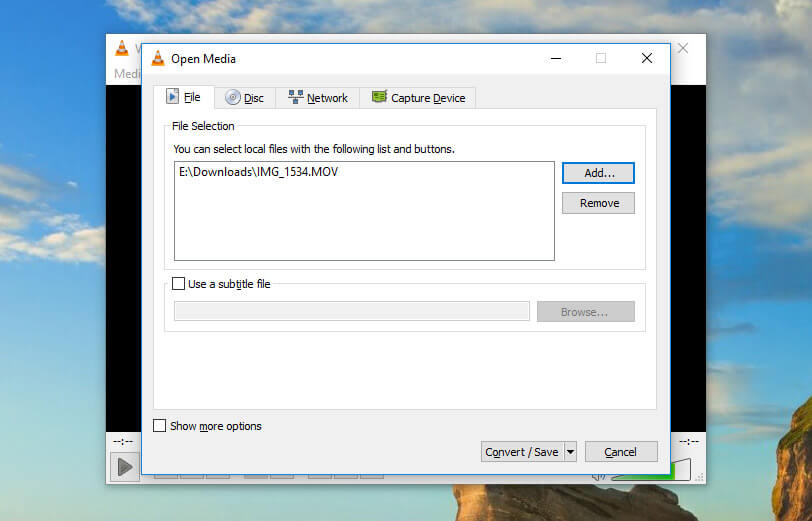
First, download VLC (Windows, Mac, and Linux versions are available). After it’s done installing, click Media > Convert/Save (Or by using the cmd+shift+S keyboard shortcut).
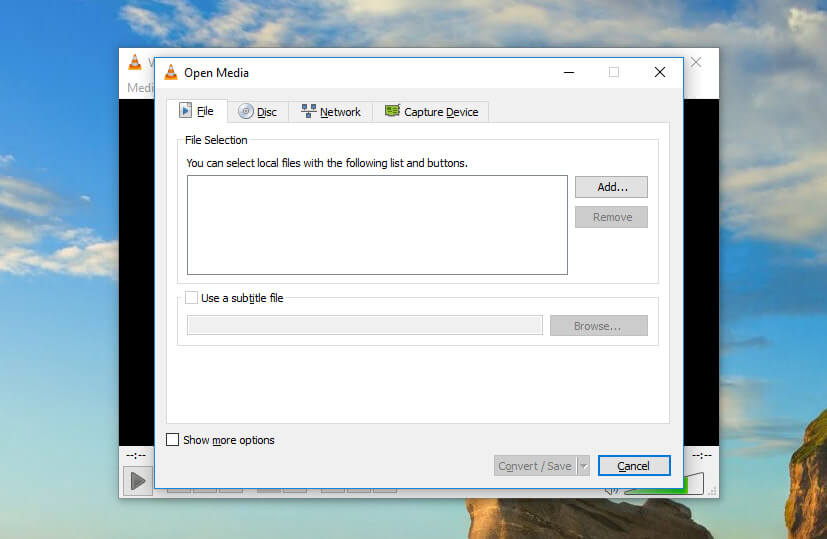
Then click Add and select your video file (you can also select multiple files to convert them as a batch).
Click Convert/Save to bring up conversion options. In the Profile dropdown, you’ll need to select the type of conversion that you want.
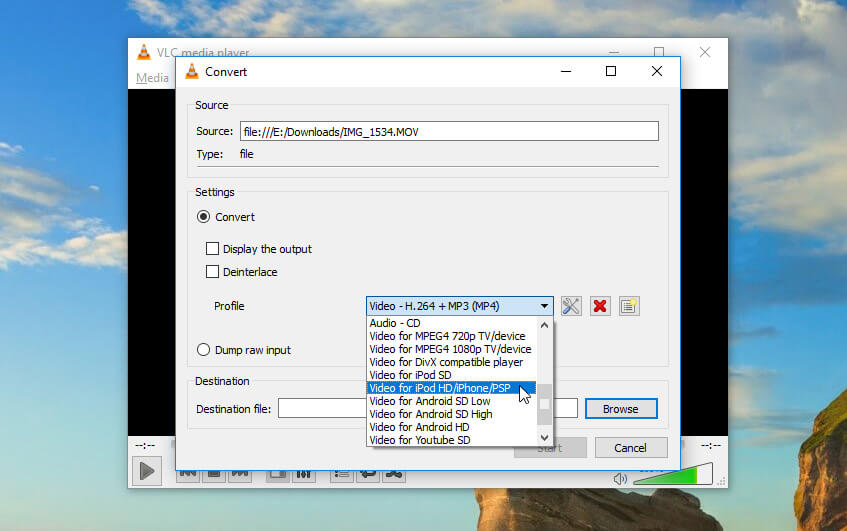
Because VLC doesn’t display estimated file sizes, you’ll need to guess at which level of conversion to apply. Fortunately, VLC has recommendations for different types of videos.
For example, if you’re uploading to YouTube, you probably want to retain high quality. Just select Video for YouTube HD. Think people will be watching your video on a TV? Use Video for MPEG4 1080p TV/device. Want something smaller? Try Video for MPEG4 720p TV/device. Optimizing for Android, iPod, or iPhone will also get you smaller video files.
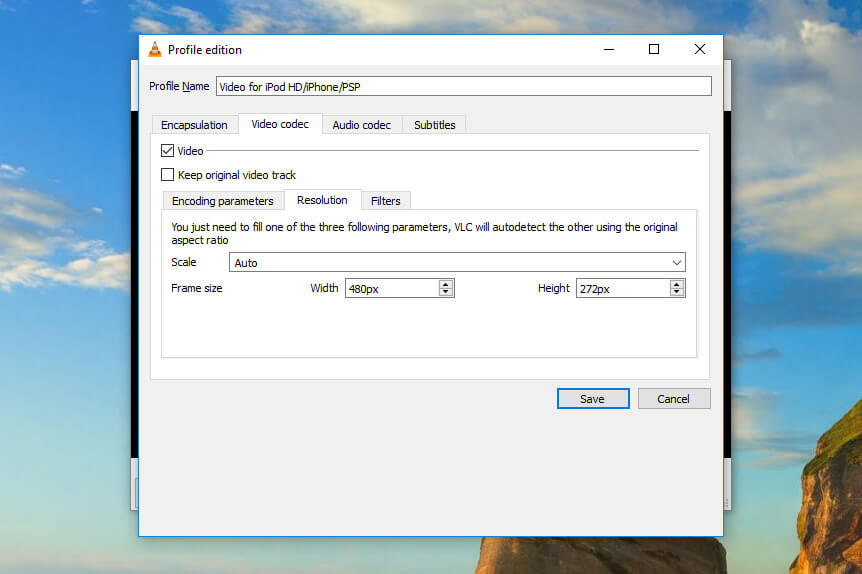
To further reduce your video file size, you can change the resolution of the video. Click the Settings button (it looks like a wrench and a screwdriver) to the right of the Profile dropdown, then select the Resolution tab.
From there, you can adjust the scale to retain your current proportion, or manually adjust the size of the video.
When you’re done, click Save. You’ll need to enter a destination location and filename—click Browse to specify them.
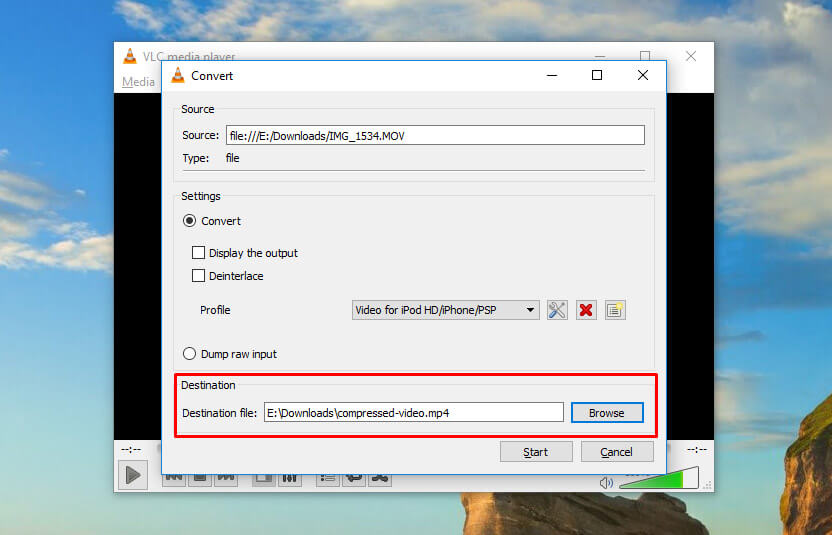
Once you’ve done that, just hit Start.
If you’re compressing a large video, it might take some time. But when it’s done, you’ll have a new video file that should take up a lot less space.
2. Shotcut (Windows, Mac, Linux)
While not as popular as VLC, Shotcut is another common choice for people looking to make videos smaller without spending a dime. Intended more as an editor than a viewer, Shotcut gives you a lot of advanced functionality for editing your videos.
It’s not immediately clear how to compress video files with Shotcut, so we’ll walk you through it.
Download Shotcut, then open it and use the Open File button to open your video.
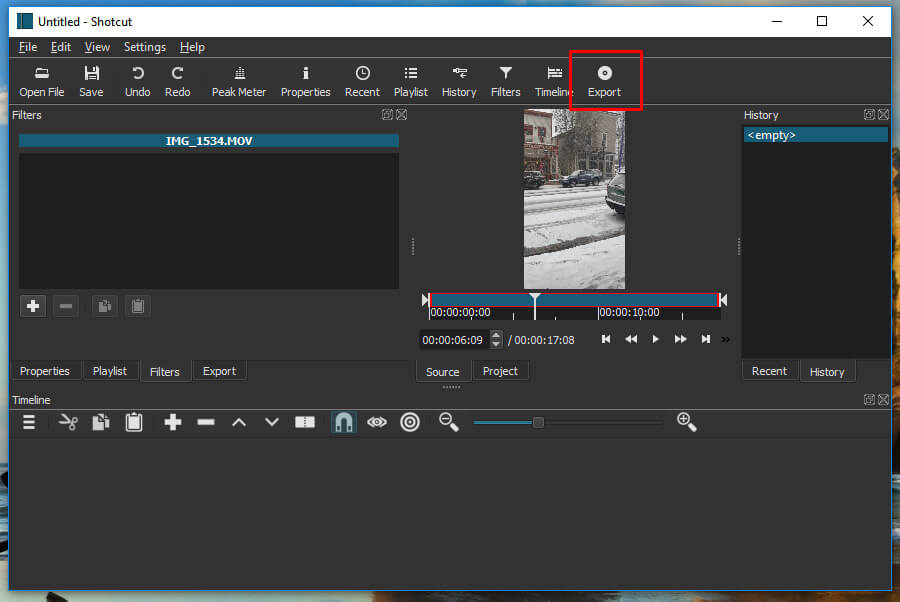
To export it in a new file format, click Export in the top-right corner of the window.
You’ll be presented with a huge list of options.
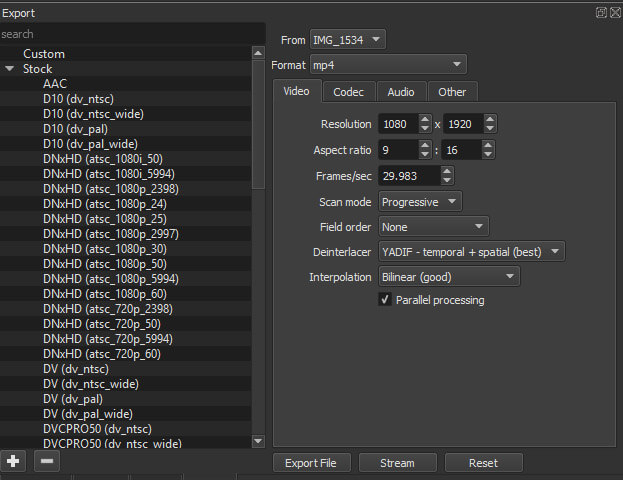
In general, using H.264 Baseline Profile is a good choice. This format will likely reduce the size of your video without sacrificing too much quality.
As you’ll see, there are plenty of other options for compression. Feel free to try some of them out to see how small they get your file. In general, the H.264 baseline will be your best bet.
You can also adjust the size of the video by changing either the Resolution or Aspect ratio fields.
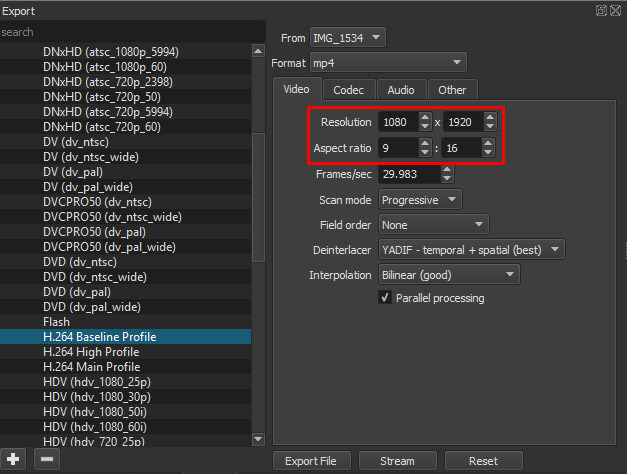
However, it’s important to know that Shotcut won’t automatically adjust the corresponding option for you. If you change the horizontal resolution, you’ll need to calculate the proper vertical resolution to make sure you don’t end up with a pinched video.
Choosing a lower-quality output will automatically adjust the resolution for you. So if you select HDV (hdv_720_25p), the resolution will decrease if your video was originally in 1080p. But if you want to go smaller than the preset resolution, you’ll need to calculate the correct dimensions yourself.
You can also use the export window to customize exporting options to get exactly the type of file you want. This is best left to expert users, though you can certainly play around with it to see what happens.
3. QuickTime Player (Mac)
Apple’s default media player actually includes a number of great options for making your videos smaller. The only drawback to it is that you can’t use it on any other operating systems.
To make a video smaller with QuickTime, open the app from your Applications folder and click File > Open File to load your video.
To begin making your video smaller, click File > Export As. Unfortunately, QuickTime doesn’t give you as many options as some other apps. You’ll see 4k (if applicable), 1080p, 720p, and 480p options.
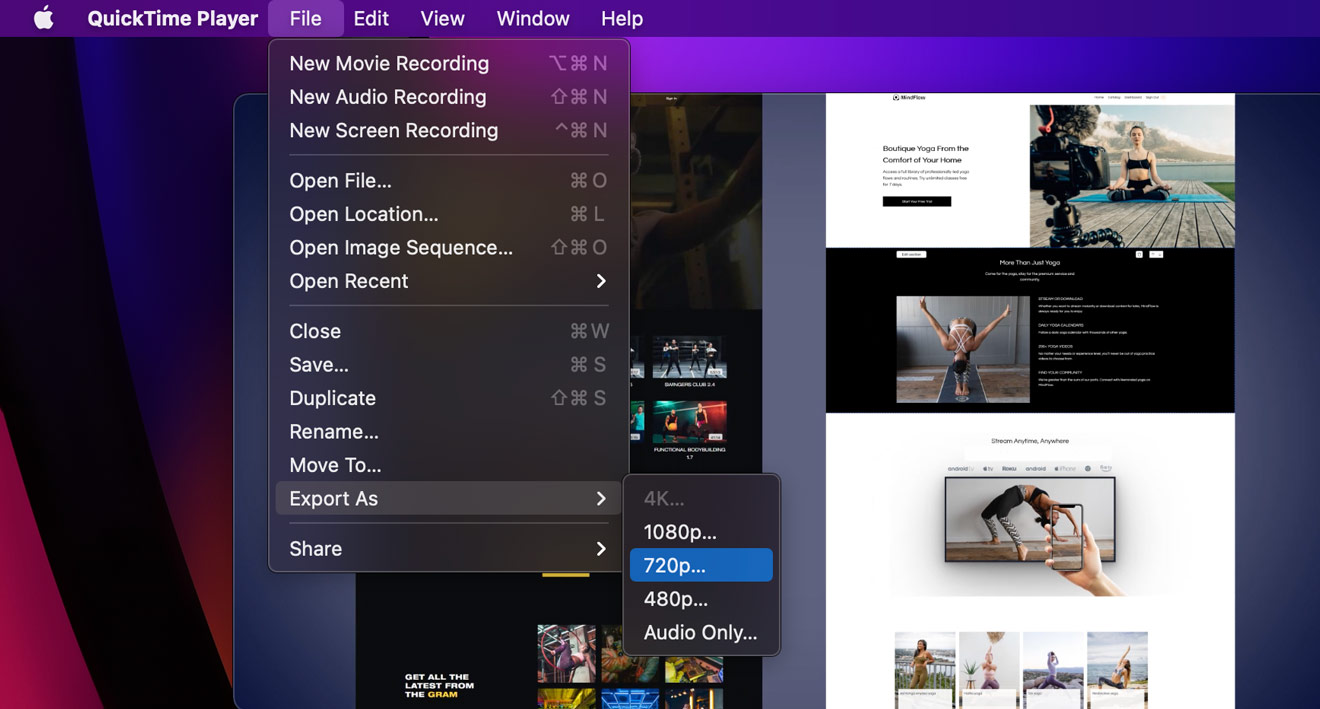
Select 720p or 480p (assuming you recorded in 1080) and export your file. It should be smaller than when you started.
Unfortunately, QuickTime doesn’t support resizing, so if you need to reduce the dimensions of your video, you’ll need to use another program, or use a web-based video compression tool such as VEED, ClipChamp, or Kapwing (More on this below).
4. VEED (Web)
If you don’t want to download or use an app on your own computer, there are numerous websites that will let you upload a video file and compress it for you. Some of these services require an account, some require a monthly fee (or a watermark on your video), and others are completely free and don’t require anything but a video file.
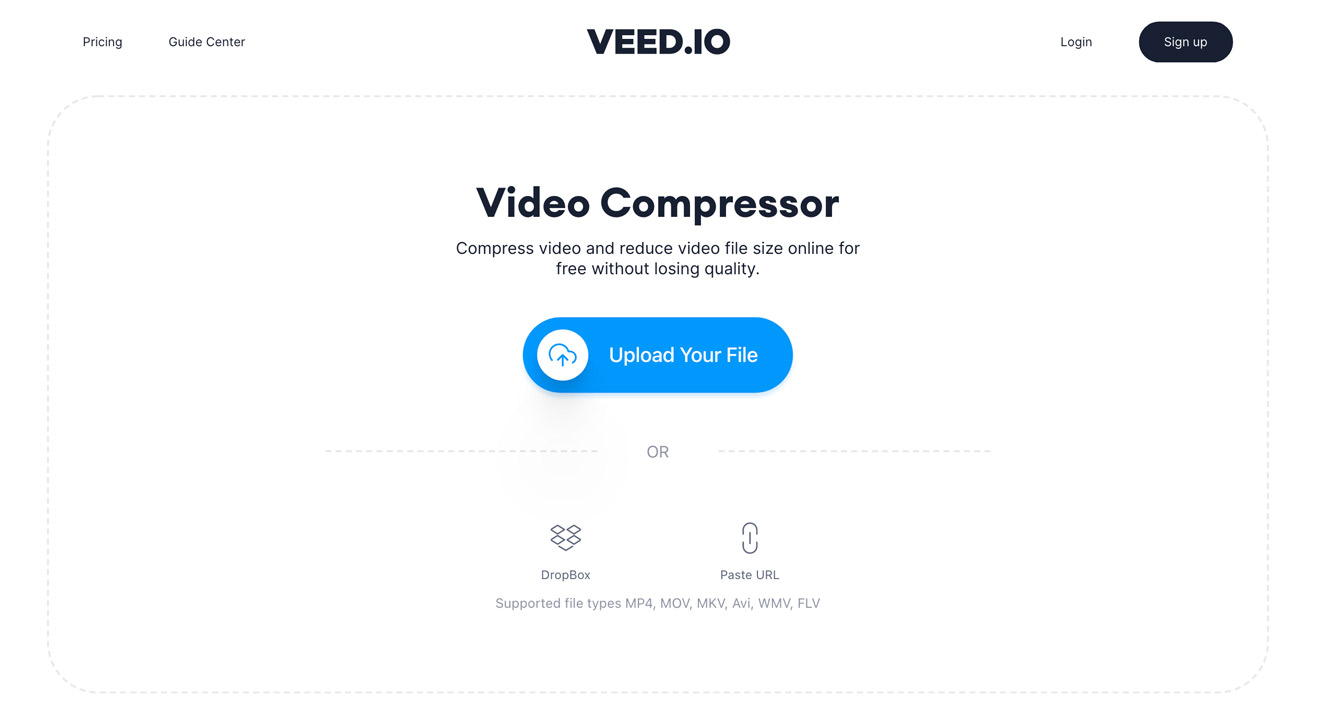
The first service we’ll look at is VEED.IO. As part of their video editing tools, VEED offers an easy-to-use video compression tool to reduce video file size for free. It works with both Windows and Mac, and within your browser, so there’s nothing to download.
VEED’s Video Compressor supports MP4, MOV, MKV, Avi, WMV, FLV video file formats. If you use Dropbox to host your videos, you can connect your account and directly upload your videos to the tool.
It has a user friendly slider that allows you to adjust the compression rate between higher quality and smaller file size.
What’s more helpful about this Video Compressor, in particular, is that it gives you an estimate of the file size before you hit the ‘Compress’ button. This is particularly useful if you’re looking to compress videos and get your video small enough to be added as an email attachment or sent through a messaging service where there is a limit on files sizes. For many email clients, this is 20-25MB. So you can play with the settings, to get the size right, before you compress.
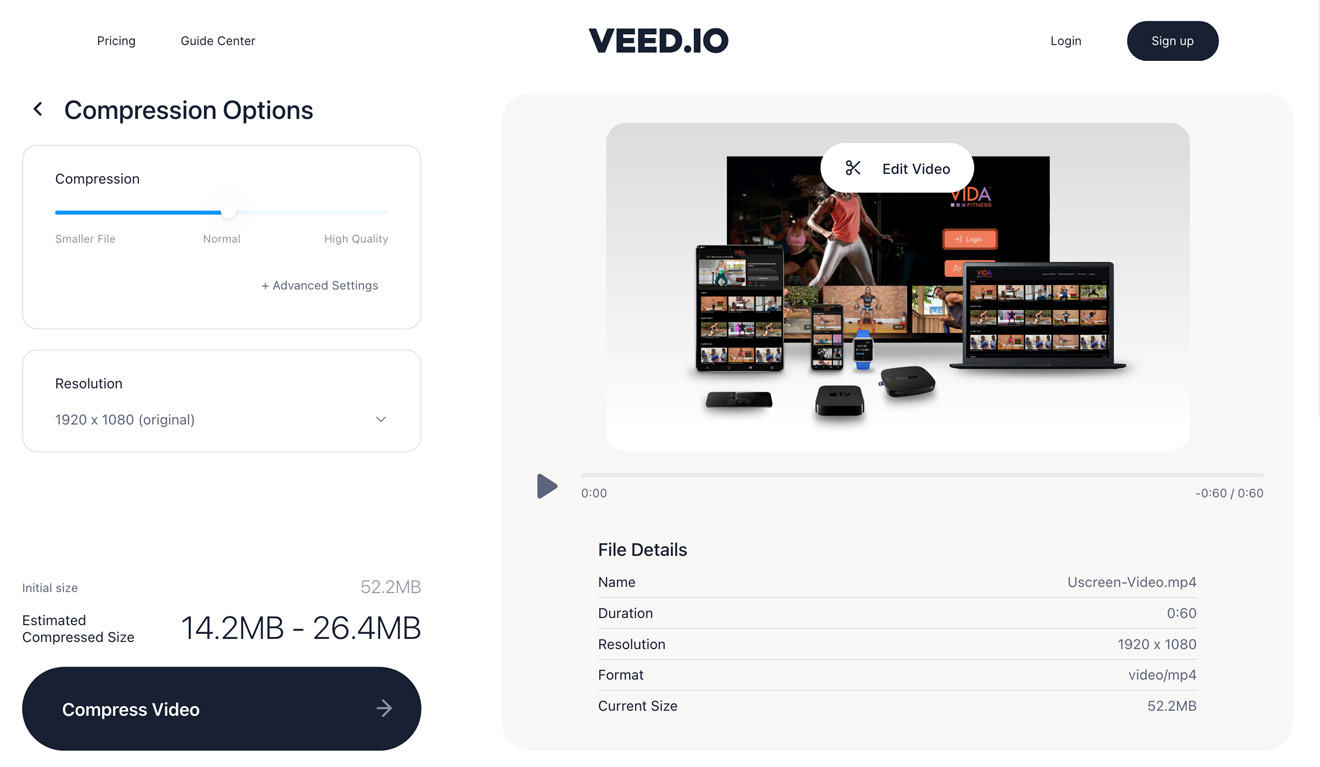
For more advanced users, or those needing to specify the frame rate, bitrate, and CRF, you can simply hit the ‘Advanced Settings’ button in the Video Compression settings, and all of these options are available to you. And, of course, you can resize your videos and change the video resolution.
It gives a great reduction in file size and an option to ‘Download’ or ‘Edit Video’. If you click on ‘Edit Video’ you will be taken to VEED’s main editor where you can add subtitles, text, progress bars, and more.
5. VideoSmaller (Web)
VideoSmaller is yet another simple cloud-based video compressor to reduce video file size online. And it’s completely free. Head to VideoSmaller.com, upload your video, tweak a couple of options, and you’re good to go.
VideoSmaller supports a variety of different video file formats including MP4, AVI, MPEG, MOV formats, and allows you to upload video files of up to 500 MB.
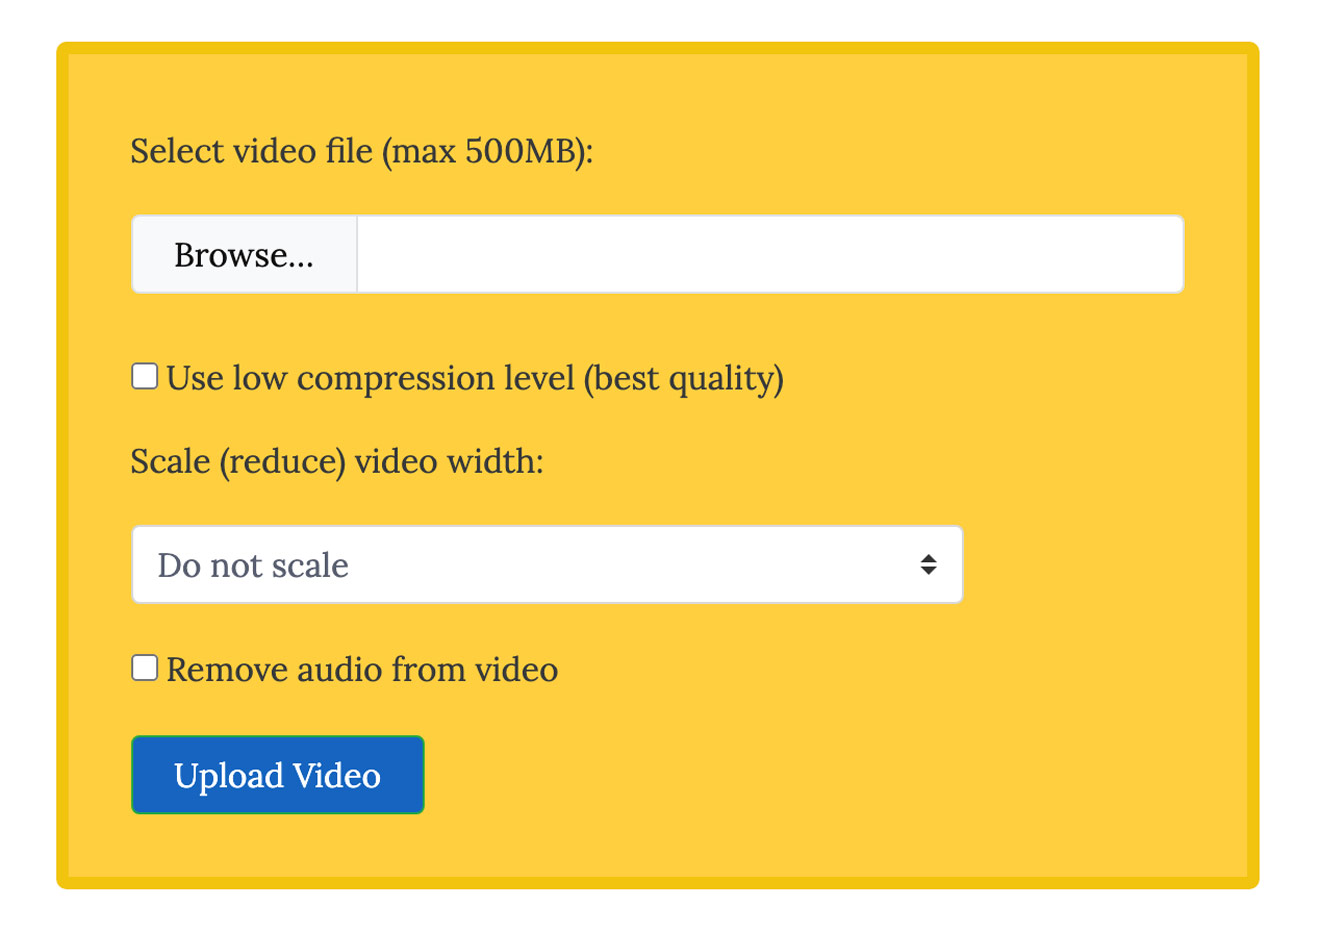
The first option you have is to use a low compression level. This gives you better- resulting quality in your video, but won’t reduce the size of a video as much as using standard compression.
The second option is to scale your video. Of course, scaling down also results in lower quality, but it might be worth the tradeoff in size. So you’ll need to balance the needs of your audience (mostly concentrating on the devices they’ll be using to watch your videos) with size considerations.
Finally, you can check a box to remove all of the audio from your video. Again, this could save you a notable amount of space. But it leaves you without any sound.
6. Clipchamp (Web)
If you need to reduce the file size of videos on a regular basis, you may want to consider using a paid service like Clipchamp. Clipchamp gives you more options, including the ability to edit your videos, upload videos of any size, and process videos in batches.
Clipchamp does have a free tier, but it watermarks your videos. So if you’re going to be sharing videos, you should probably step up to the Business plan, which is $7.50 per month when billed as $99 per year. You can also pay $9 month-to-month if you’re not going to need it very long.
Whether or not it’s worth paying for depends on how often you’ll use it. But if you want to make the process as easy as possible without downloading software to your computer, Clipchamp is a good bet.
Experiment to Find the Best Video Compression Settings & File Size
No matter what you’re using your video for, whether monetizing your content online, or live streaming on social media, there’s a good balance that you can strike between low file size and high video quality. It’s difficult to find the point where they’re balanced, but with a little experimentation, you should be able to do it.
Especially if you’re hosting your own videos, finding the right size and quality is crucial. You need to provide your viewers with the best quality without using so much bandwidth that you have to pay a fortune. And compressed videos can help with that.
Test different resolutions and bitrates to see how they affect quality. Check the OTT platform of your choice to learn more about their guidelines and recommendations for video upload and quality settings. Then check out different encoding settings to see how they change the size of your video.
After some experimentation, you’ll find the perfect settings to make your videos smaller. And that will save you both space and money, no matter which platform you’re on or cloud platform you use.